Subwoofer Crossover Settings Guide for Music
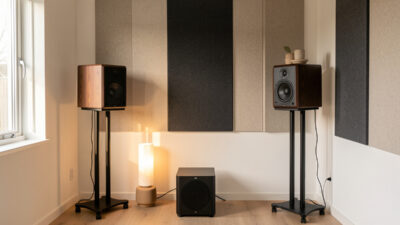
The crossover is where a subwoofer hands off to your main speakers, and getting it right is the difference between a sub that disappears into the music and one that hums in the corner. The short version: set the low-pass filter about an octave below where your mains roll off — for a standmount honest to 50Hz, start around 70 to 80Hz — then measure and adjust. Everything else is refinement.
I have set crossovers by ear, by spec sheet, and by sweep, and only the sweep removes the guesswork. But you can get most of the way there with a clear understanding of what each control does and a sensible starting point. This guide walks through the low-pass frequency, slope, phase, and level — the four settings that decide whether the handover is seamless — and how to confirm it with a measurement. It is the detail behind my stereo subwoofer guide.
What the Crossover Actually Does
The crossover splits the signal by frequency: the subwoofer plays everything below the crossover point, the main speakers play everything above. On a sub, the relevant control is the low-pass filter, which sets the upper limit of what the sub reproduces. The goal is for the sub’s roll-off and the mains’ natural roll-off to overlap smoothly so there is neither a dip nor a hump at the handover frequency.
One critical setup note: if you are using the sub’s own low-pass filter, turn off or bypass any crossover the sub also applies to a line-level pass-through, and if your amp or DSP is already applying a crossover, set the sub’s filter to its maximum or bypass so you are not filtering twice. Double-filtering is a common cause of a thin, disconnected handover, and it is invisible until you measure. When I integrate through a miniDSP, I bypass the sub’s filter entirely and do all the crossover work in the DSP, as covered in my miniDSP 2×4 HD setup guide.
Choosing the Low-Pass Frequency
Set the crossover roughly an octave above where your main speakers start dropping off, so the sub fills in below before the mains run out of clean output. The smaller the speaker, the higher the crossover. A small standmount honest to 55 or 60Hz wants a crossover around 80Hz; a larger standmount good to 45Hz can cross lower, around 60 to 70Hz; a capable floorstander might only need a sub below 40 to 50Hz. The aim is no gap and no overlap bump.
There is a tension to manage: cross too low and you leave a hole in the midbass that the mains cannot fill cleanly, asking them to work in exactly the region you wanted to relieve. Cross too high — above about 80Hz — and the sub starts to become locatable, because there is enough directional information near 100Hz for your ears to point at the box in the corner. For music, I treat 80Hz as a ceiling and work downward from there based on what the mains can actually do. The widely used 80Hz home-theater default exists for a reason, but a music system with capable mains often integrates better lower.
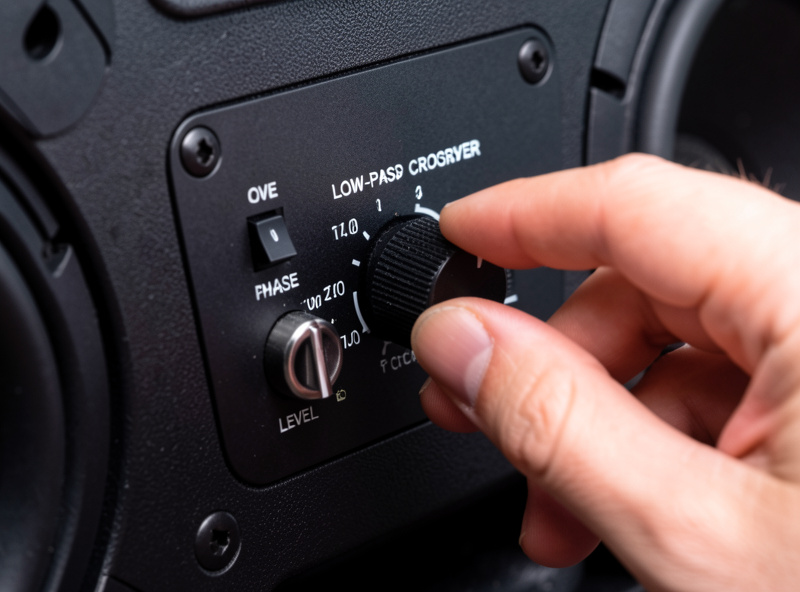
Slopes: 12 vs 24 dB per Octave
The crossover slope sets how quickly the sub rolls off above the crossover point. A steeper slope, such as 24dB/octave, hands off faster and keeps the sub more firmly out of the locatable region, but it stacks more phase shift around the crossover, which can make time alignment fussier. A gentler 12dB/octave slope blends more gradually but lets the sub play a little higher, so it needs a slightly lower crossover to stay hidden.
In practice I start with a 24dB/octave low-pass on the sub and a matching high-pass on the mains when I have that control, because the steeper handover makes the sub harder to localise and gives a cleaner split. If you only have a fixed 12dB/octave filter on the sub, drop the crossover frequency a touch to compensate. Neither is wrong; the slope just changes where you set the frequency and how carefully you align phase.
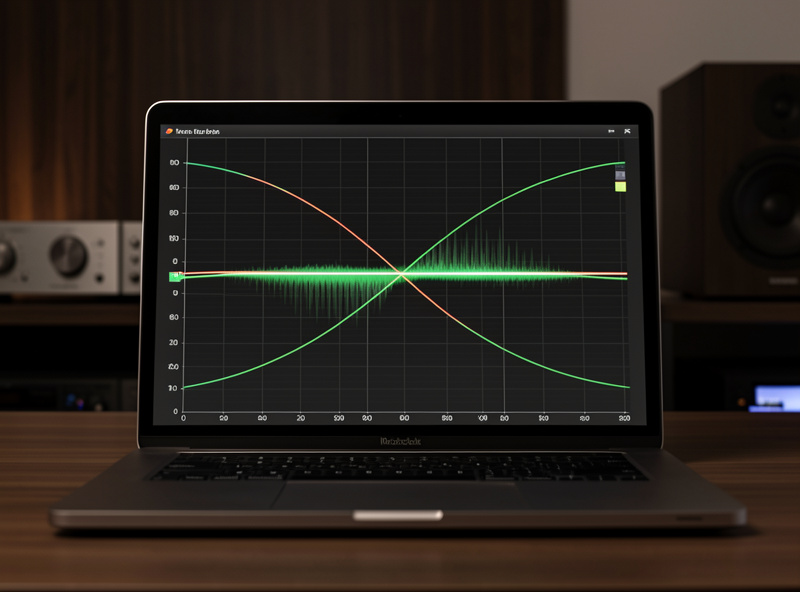
Phase and Delay: Aligning Sub and Mains
Phase decides whether the sub and mains add or partially cancel through the crossover region. If they are out of phase at the handover, you get a dip exactly where you wanted a smooth blend — and people often misread that dip as needing more level, then overdo the bass everywhere else to compensate. The fix is alignment, not volume.
The reliable way to set it: measure the summed response of sub-plus-mains at the crossover frequency, try the phase control at 0 and 180 (and the continuous control if you have one), and keep whatever setting produces the highest output through the crossover. Higher summed output means they are arriving in time. With a DSP you can set a precise delay instead, which is finer than a two-position phase switch and lets you dial the alignment exactly. This is one of the biggest audible wins in the whole setup and the step most people skip. My subwoofer EQ integration piece shows the measured before-and-after.
Level Matching to a Smooth In-Room Slope
Level is the easiest control to get subtly wrong, because more bass sounds impressive for the first ten minutes and fatiguing after an hour. Set the sub so that, on familiar music, you can only confirm it is on by switching it off — the bass should feel like it belongs to the speakers, not like a separate source. Resist the urge to make the sub announce itself.
One nuance worth knowing: a response that measures perfectly flat in-room usually sounds bass-light, because we are used to the gentle rise that small rooms and speakers produce. I aim for a smooth, very slightly downward-tilted in-room slope rather than a ruler-flat line, then trust it on a week of real listening. If after a few days the bass feels heavy on dense tracks, I trim the level a decibel rather than re-EQ. The goal is balance you stop noticing.
Should You High-Pass the Mains?
High-passing the mains — rolling them off below the crossover so they stop trying to reproduce deep bass — is one of the most underrated upgrades in a sub setup. It relieves your main speakers of the cone excursion that causes distortion and intermodulation in the midrange, which is exactly where you hear it. The result is usually a cleaner, more open midrange and more headroom from the mains.
The catch is that not every system lets you do it. You need a pre-out and a way to insert a high-pass filter, which a DSP provides cleanly, or a sub with a high-pass output that feeds the mains. If you have only speaker-level connection and no DSP, the mains run full-range and you lose this benefit — still fine, just not optimal. When I can high-pass the mains, I always do; it is a free improvement to the part of the spectrum you care about most. The matching considerations are in my amplifier matching guide.
The Crossover Mistakes I See Most
Three errors account for most bad subwoofer integration, and none of them are about the gear. The first is leaving the crossover too high — anything much above 80Hz pulls the sub up into the locatable range and smears the midbass, so the bass seems to come from the corner rather than the soundstage. The second is double-filtering, where both the sub and a DSP or amp apply a crossover and the handover ends up thin; pick one filter and bypass the other.
The third, and the most stubborn, is fixing a phase-induced dip with level. When the sub and mains cancel at the crossover you get a notch, and the instinct is to crank the sub until the notch fills — which it never quite does, while every other bass frequency now booms. Always rule out phase before you touch the level knob. Get these three right and the rest of the settings fall into place quickly, because you are refining a system that is already fundamentally aligned rather than fighting one that is not.
Crossover Starting Points by Speaker
| Main Speaker | Approx. Roll-Off | Starting Crossover | Notes |
|---|---|---|---|
| Small standmount | 55 to 60Hz | 80Hz | Cross higher; relieve the small driver |
| Larger standmount | 45 to 50Hz | 60 to 70Hz | The common music sweet spot |
| Compact floorstander | 40 to 45Hz | 50 to 60Hz | Sub fills the bottom octave |
| Full-range floorstander | 30 to 35Hz | 40 to 50Hz | Sub for the very bottom and modes |
Measure, Then Live With It
Every number above is a starting point, not a destination, because your room has the final say. Once the crossover, slope, phase, and level are roughly set, run a sweep with a calibrated mic and look at the response through the crossover region: a smooth handover with no deep dip or hump means you are aligned. If you see a dip at the crossover, fix phase before touching level; if you see a broad hump, trim level or notch it with a single parametric filter rather than chasing it with the crossover frequency.
Then stop fiddling and listen for a week. The most common mistake I see — and made myself for years — is re-tuning every session chasing a different sound on every record, when the real issue is that bass varies hugely from track to track. Set it by measurement, confirm it on music you know cold, and leave it alone. If you want the measurement process in full, it is in my REW guide, and placement, which matters even more than these settings, is in the subwoofer placement guide.