Speaker and Room Acoustics: The Complete Guide for Better Sound
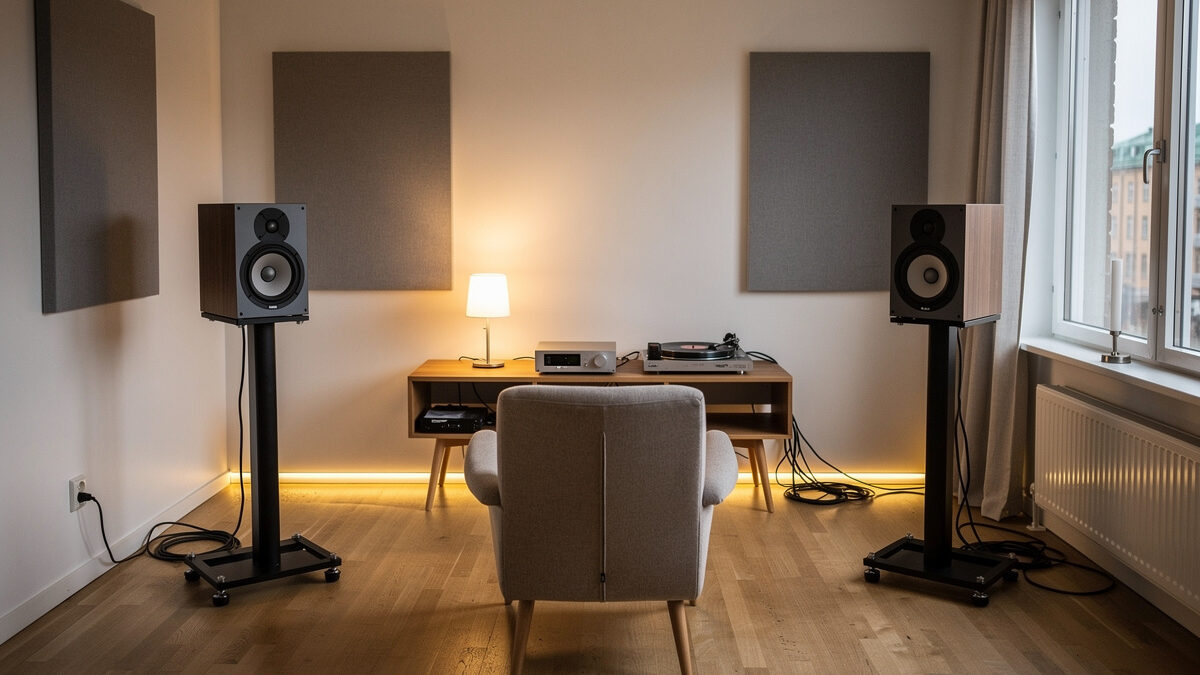
Most people upgrade their speakers when what they actually need is to fix their room. The same pair of speakers placed in a bare drywall box versus a treated room with absorption at first-reflection points will sound like two different systems — one harsh and boomy with a collapsed soundstage, the other controlled and dimensional. I learned this in my own listening space in Sweden, a modest room where the near-field setup and a few broadband absorbers did more for the sound than any component swap I have made.
What follows is the guide I wish I had when I started treating speakers and room as one system rather than two separate problems. No six-figure-system aspiration, no cable mysticism. Just the relationship between speakers and the room they play into, and how to get better sound without spending on the wrong things first.
The Room Is the Second Speaker: Why Acoustics Matter Before Anything Else
Below roughly 300 Hz — the transition frequency where room modes dominate — the room controls the bass response more than the speaker does. A speaker with a ruler-flat anechoic frequency response placed in an untreated room will measure with peaks and nulls of 10 to 15 dB in the bass region. Those peaks make certain bass notes boom at double the perceived volume of others. Those nulls cancel bass notes entirely — you can stand in a null and hear almost no bass from a speaker that is producing plenty of it. No speaker upgrade fixes this because the problem is not the speaker. It is the standing waves between parallel walls, floor, and ceiling.
Above 300 Hz, early reflections from side walls, the floor, and the ceiling reach your ears within 1 to 5 milliseconds of the direct sound from the speaker. Your brain fuses these early reflections with the direct sound, and the result is a smeared stereo image — the soundstage collapses, instrument placement blurs, and the sense of depth that separates a good system from a mediocre one disappears. Absorbing or diffusing these first reflections is the cheapest upgrade in audio because it costs about $100 in materials and recovers more detail than a $1,000 component swap. The speaker placement guide covers positioning, and understanding what to put on the walls and where is the next step after positioning.
Speaker Types: Bookshelf, Floor Standing, and Everything Between
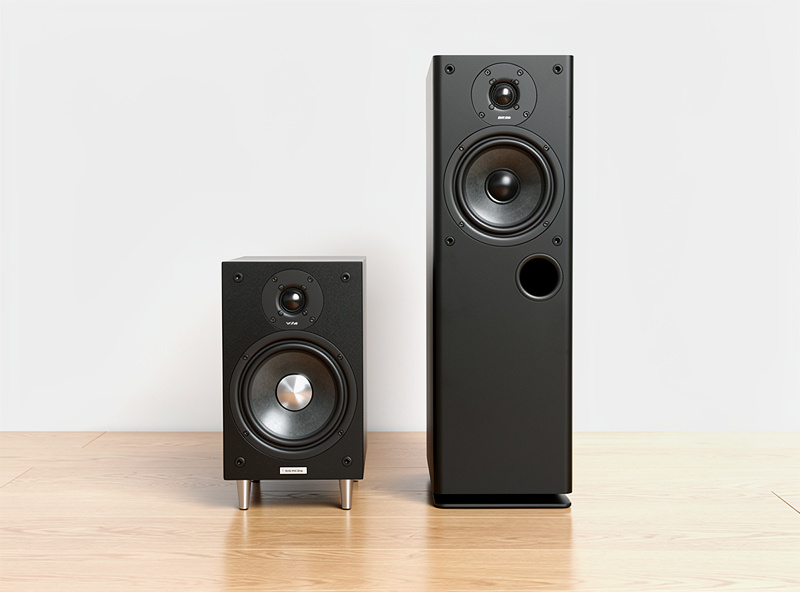
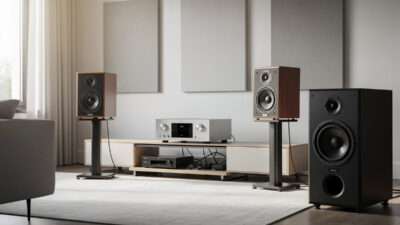
Bookshelf speakers — more accurately called stand-mount speakers — are the right choice for small to medium rooms under roughly 200 square feet. They image more precisely than floor standers at the same price point because the smaller cabinet produces fewer internal resonances, and the narrower baffle creates a wider and more accurate soundstage. The trade-off is bass extension — most bookshelf speakers roll off between 50 and 70 Hz, which means the bottom octave of a bass guitar or the fundamental of a kick drum lives below what the speaker can reproduce. A subwoofer solves this — crossing over at 80 Hz with a 24 dB/octave slope makes the transition seamless, and the main speakers perform better because they are relieved of the bass excursion that modulates the midrange. Stand-mount speakers need stands, which cost $100 to $300 for a pair, and that cost should be factored into the budget — a $500 pair of bookshelf speakers on $200 stands competes with a $700 pair of floor standers.
Floor standing speakers add cabinet volume for deeper bass extension — typically down to 30 to 40 Hz — and higher output capability because the larger cabinet supports multiple woofers. They are the right choice for rooms above 200 square feet where the listening distance exceeds 8 feet. The larger cabinet also introduces more internal standing waves and panel resonances, which require more careful engineering to control. A well-designed bookshelf speaker at $800 will image better than a floor stander at the same price, but it will not play as loud or as deep. The choice is about room size and listening priorities, not about one format being inherently better. The bookshelf speaker guide covers the smaller format in detail, and floor standing models occupy a different price and performance tier worth understanding separately.
Electrostatic and planar magnetic speakers — the Magnepans and Quad ESLs of the world — are dipole radiators that fire sound forward and backward equally. The backward wave reflects off the wall behind the speaker and creates a sense of depth and spaciousness that box speakers cannot match because the reflected energy contributes to the soundstage rather than fighting it. The trade-off is placement: dipoles need at least 3 feet behind them to let the rear wave develop, and they need space from side walls because the dipole null at the sides collapses if reflected too early. In a small room, dipoles are almost impossible to position correctly. In a dedicated listening room with space behind and beside them, they produce the most dimensional soundstage available without spending five figures. The dipole vs monopole trade-off is a deep topic — open baffle and electrostatic designs trade efficiency and bass extension for the most dimensional soundstage available without spending five figures.
Speaker Placement: The Free Upgrade That Changes Everything
Moving speakers changes the sound more than any cable, any amplifier swap, and most DAC upgrades. The distance from the front wall — the wall behind the speakers — controls bass reinforcement. Speakers placed directly against the wall gain up to 6 dB of bass boost from boundary reinforcement, which makes the low end boomy and one-note. Pulling them out by 2 to 3 feet reduces the boundary effect and lets the speaker’s own bass tuning work as designed. The trade-off is that pulling speakers into the room reduces the overall bass output, which is why some listeners prefer the wall-adjacent placement — they are hearing more bass, not better bass.
Toe-in — angling the speakers toward the listening position — controls the treble balance and soundstage width. Pointing speakers directly at the listening position maximizes treble energy on-axis and narrows the soundstage because the direct sound dominates the reflected sound. Pointing them straight ahead with no toe-in widens the soundstage and reduces treble because you are listening off-axis. The correct toe-in is the one that balances treble energy and soundstage width for your speakers in your room, and it is found by listening, not by calculation. Start with the speakers pointed at your shoulders rather than your head, play a track with a centered vocal and clear stereo separation, and adjust in small increments until the vocal locks into the center and the instruments spread across the width of the speakers without collapsing into the left and right extremes. The speaker placement guide has the full methodology.
The equilateral triangle rule — the distance between the speakers equals the distance from each speaker to the listening position — is the starting point for stereo imaging. From there, adjust the speaker-to-listener distance slightly longer than the speaker-to-speaker distance for a wider soundstage with slightly less precise imaging, or slightly shorter for tighter imaging with a narrower soundstage. The adjustment range is small — a few inches either way — but the effect on the stereo image is immediate and obvious. The near-field approach — sitting closer to the speakers — reduces the contribution of room reflections because the direct sound arrives louder relative to the reflected energy, and the technique is particularly effective in small rooms.
Room Treatment: What Goes Where and Why
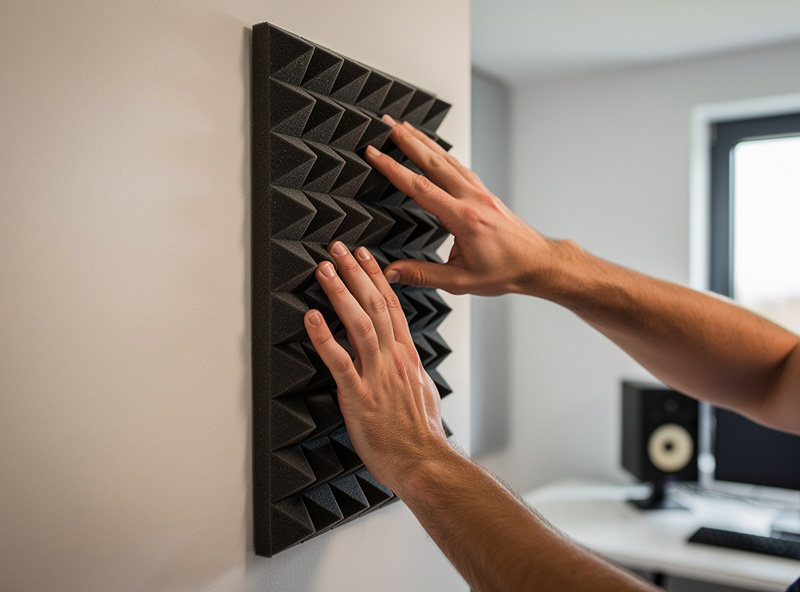
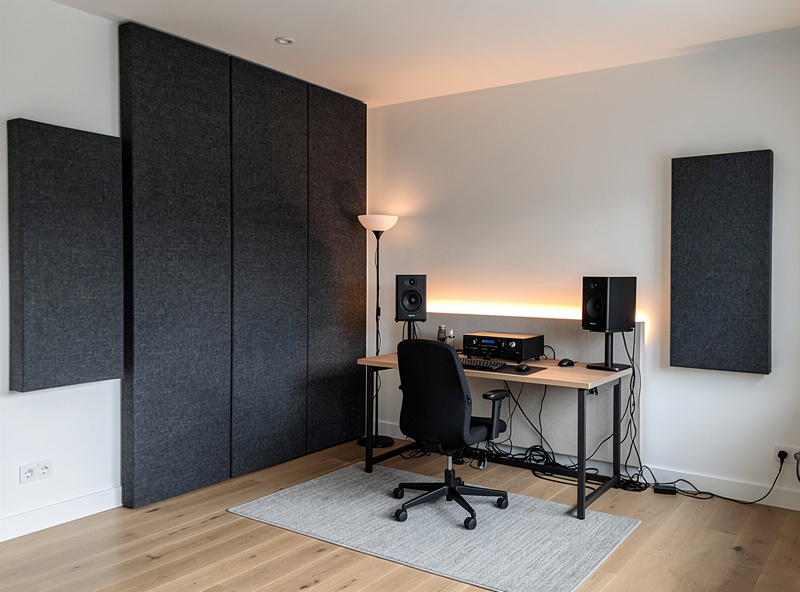
Broadband absorption at the first-reflection points is the highest-ROI room treatment. The first-reflection points are the spots on the side walls, ceiling, and floor where sound from the speakers reflects once before reaching your ears. Find them with the mirror trick: sit in the listening position, have someone slide a mirror along the side wall, and mark the spot where you can see the speaker’s tweeter in the mirror. That is the first-reflection point. A 2-inch-thick broadband absorber panel — Owens Corning 703 rigid fiberglass or Rockwool rockboard in a fabric frame — placed at that spot absorbs frequencies above roughly 500 Hz and eliminates the reflection that smears the stereo image. Two panels per side wall, one at each speaker’s first-reflection point, costs about $80 in materials and transforms the soundstage more than any $1,000 component upgrade.
Bass trapping in corners addresses the room modes below 300 Hz that cause boomy, uneven bass. Floor-to-ceiling bass traps in the front corners — the corners behind the speakers — absorb bass energy and reduce the magnitude of room-mode peaks and nulls.
A proper bass trap is at least 4 inches thick and spans from floor to ceiling, and the material is the same rigid fiberglass or rockboard used for broadband panels, just thicker. Two corner traps, one in each front corner, cost about $120 in materials and reduce the worst bass problems by roughly half — not eliminated, but tamed enough that equalization can handle the remainder. My home audio equalization guide picks up exactly where the traps leave off — measurement, parametric correction, and the order of operations for getting from a treated room to a corrected one. More on bass trapping — corner placement, thickness, and material selection — is worth studying before buying treatment panels because the wrong thickness at the wrong location does almost nothing.
Diffusion scatters sound rather than absorbing it, preserving the energy in the room while breaking up the coherence of reflections. A diffusor on the rear wall behind the listening position — a skyline or quadratic-residue diffusor — creates a sense of a larger, more spacious room without the deadened quality of over-absorption. Diffusion is the right treatment for the rear wall because absorbing the rear reflections makes the room sound small and closed-in. Diffusion keeps the room alive while controlling the reflection pattern. The plants for listening room guide covers natural diffusion strategies alongside treatment panels.
Speaker Type Comparison by Room Size and Priority
| Speaker Type | Best Room Size | Bass Extension | Imaging | Amplifier Needed | Price Range (Pair) |
|---|---|---|---|---|---|
| Bookshelf / Stand-mount | Under 200 sq ft | 50–70 Hz | Excellent | 50–150W into 8 ohms | $300–$2,000 |
| Floor Standing / Tower | Over 200 sq ft | 30–45 Hz | Good | 80–250W into 8 ohms | $600–$5,000 |
| Bookshelf + Subwoofer | Under 200 sq ft | 20–30 Hz | Excellent | 50–150W + sub plate amp | $500–$2,500 |
| Electrostatic / Planar Dipole | Over 250 sq ft | 40–60 Hz | Exceptional | 100–300W into 4 ohms | $600–$6,000 |
| Active / Powered | Any | Varies by model | Varies | Built-in (no external amp) | $400–$3,000 |
The bookshelf-plus-subwoofer configuration is the one I recommend for most listeners in small to medium rooms. It combines the imaging precision of a stand-mount speaker with the bass extension of a dedicated subwoofer, and it lets you position the subwoofer independently of the main speakers — which matters because the best position for bass response is almost never the same as the best position for stereo imaging.
Active Speakers: Skipping the Amplifier Problem Entirely
Active speakers — sometimes called powered speakers — have the amplifier built into the cabinet. Each driver gets its own dedicated amplifier channel connected directly to the driver with no passive crossover in between. This active crossover design eliminates the insertion loss and phase shift of passive crossovers, and it lets the manufacturer tune the amplifier to the specific driver it powers. An active speaker at $500 often measures flatter and plays cleaner than a passive speaker and external amplifier combination at $500 because the designer controls the entire chain from input to acoustic output. The powered vs passive speakers guide covers the full trade-off.
The trade-off is flexibility. Active speakers lock you into the built-in amplification — if the amplifier fails, the speaker fails. If you want to try a different amplifier character, you cannot. For listeners who treat their system as a fixed setup that does not change, active speakers are the better engineering solution and the better value. For listeners who enjoy swapping components and evolving their system, passive speakers with a separate amplifier preserve that flexibility. Neither approach is wrong — they serve different temperaments, and the sound quality at equivalent price points favors active designs by a measurable margin. The integrated amplifier guide covers the amplification side for those who choose the passive path.
Studio monitors — the active speakers designed for recording and mixing — deserve a specific mention because they are the best value in audio. A pair of JBL 305P or Kali LP-6 monitors costs roughly $300 and delivers frequency response accuracy that passive hi-fi speakers at twice the price struggle to match. Studio monitors are designed for near-field use, which suits small rooms, and they are designed for accuracy, which suits listeners who want to hear the recording rather than the speaker. The studio monitors comparison covers the monitor vs hi-fi speaker distinction, and the sound quality per dollar in the monitor category is the highest in audio — a reality the hi-fi industry would prefer you did not notice.
The powered vs passive speakers guide covers the active alternative that eliminates the external amplifier entirely, and the bookshelf speaker recommendations give specific models at the entry-level price point.
The wrong order of spending is speaker → amplifier → DAC → cables → room treatment. It should be room treatment → speaker placement → speakers → amplifier → DAC. The room and the placement are the two most influential variables, and they are the two that cost the least to optimize. A $500 pair of speakers in a treated room with correct placement will sound better than $2,000 speakers in an untreated room with compromised placement — every time, without exception. The hi-fi audio systems guide covers the full signal chain from source to room.
Room Modes and Standing Waves: Predict Your Room’s Problems Before You Hear Them
Every rectangular room has a predictable set of resonant frequencies determined by its dimensions. These are standing waves — points where sound pressure peaks and nulls at specific locations because the reflected wave arrives back at the source in phase with the next cycle. The three types are axial modes (between two parallel surfaces — floor/ceiling, side walls, front/back), tangential modes (four surfaces), and oblique modes (all six surfaces). Axial modes are the strongest because they involve the least number of reflections and lose the least energy per cycle. In a typical listening room, axial modes dominate the bass response below 150 Hz, and they are the reason bass sounds different in every seat.
Calculate your room’s axial modes with the formula: f = c / (2 × d), where c is the speed of sound (343 m/s in air at 20°C) and d is the room dimension in meters. My listening room is 3.5 m wide, 4.2 m deep, and 2.4 m high. The width modes are at 49 Hz, 98 Hz, and 147 Hz. The length modes are at 41 Hz, 82 Hz, and 123 Hz. The height modes are at 71 Hz and 142 Hz. Notice the cluster of modes between 40 and 50 Hz — that is where the bass in my room will always be uneven without treatment or equalization. The 41 Hz length mode and the 49 Hz width mode do not overlap cleanly, so the bass response varies depending on where in the room you stand relative to the walls. Every room has this pattern. The dimensions determine the frequencies, and the construction materials determine how strongly each mode rings. A concrete wall reflects nearly 100% of bass energy back into the room. A drywall-on-stud wall absorbs some bass energy through panel flexure, reducing the mode strength by 3 to 6 dB compared to concrete. If you are building or choosing a room, non-parallel walls and a non-cubic ratio (1:1.3:1.6 width:depth:height is a good starting point) spread the modes more evenly than a perfect cube, where three modes stack at the same frequency and ring like a church bell at one note.
The Schroeder frequency — roughly 2000 × sqrt(RT60 / volume) — marks the transition between the modal region below, where individual standing waves dominate, and the diffuse region above, where reflections blend into a statistical reverberant field. In a typical 40 cubic meter listening room with an RT60 of 0.4 seconds, the Schroeder frequency is around 280 Hz. Below this frequency, you are fighting individual room modes one at a time. Above it, broadband absorption and diffusion control the overall character of the room. This is why bass traps are narrowband tools targeting specific modes, while broadband absorbers treat the entire range above the Schroeder frequency. Understanding where the transition happens in your room tells you what kind of treatment works where — corner bass traps below 280 Hz, broadband panels at first-reflection points above.
How to Measure Your Room: REW, Measurement Mics, and What the Graphs Actually Tell You
A $100 measurement microphone and free software produce more useful information about your room than ten years of reading forum opinions about speakers. The standard setup is a MiniDSP UMIK-1 USB measurement microphone ($79) and Room EQ Wizard (REW), free software that generates test signals and displays frequency response, waterfall plots, spectrograms, and impulse response. The microphone comes with a calibration file that compensates for its own frequency response deviations — without calibration, telling room problems from microphone problems is guesswork. Place the microphone at the listening position at ear height, pointing at the midpoint between the speakers, and run a frequency sweep from 20 Hz to 20 kHz. The result is a graph of sound pressure level versus frequency at the listening position. That single graph contains more truth about your system than any subjective review, because it shows you exactly what arrives at your ears after the room has done its work.
A waterfall plot — also called a cumulative spectral decay or CSD — shows how the frequency response changes over time after the test signal stops. The X-axis is frequency, the Y-axis is level, and the Z-axis (shown as a series of decaying slices) is time. A waterfall plot reveals room resonances that are invisible in a steady-state frequency response. A peak at 60 Hz in the frequency response could be a room mode that rings for 300 milliseconds or a speaker resonance that decays in 50 milliseconds. The waterfall tells you which: a long ridge extending into the time axis is a room mode that needs bass trapping. A short ridge that decays quickly is less problematic — it may color the tonal balance slightly, but it does not smear transients. To generate a useful waterfall plot in REW, set the time window to 300 milliseconds with a 50 dB dynamic range, and look for ridges that persist beyond 150 milliseconds in the bass region. Those are your treatment targets.
The spectrogram is the waterfall’s more detailed cousin, showing the same data as a color map with frequency on the X-axis and time on the Y-axis, with color representing level. A spectrogram makes it easy to see which frequencies ring longest — bright horizontal bands at specific frequencies indicate room modes. The RT60 measurement — the time it takes for sound to decay by 60 dB — is less useful in small rooms than in concert halls because small rooms do not have a true diffuse reverberant field. In a small room, what REW calls RT60 is really a measure of the modal decay time at specific frequencies, not a uniform reverberation time. Take small-room RT60 numbers with a grain of salt, but use the waterfall and spectrogram to identify which modes need trapping. The room acoustics treatment guide covers exactly what to do with the information these measurements reveal.
The Listening Position: Beyond the Equilateral Triangle
The equilateral triangle is the starting point for stereo imaging, but the listening position within the room is equally important and rarely discussed. The 38% rule states that the listening position should be roughly 38% of the room length from the front wall or the rear wall — not at 50%, not at 25%, and definitely not against the back wall. At 50%, you sit in the null of the first axial length mode, where bass at that frequency cancels almost completely. At 25%, you sit in the peak of the second harmonic of the length mode — boomy, one-note bass. At 38%, you are between the peak and null of the first two axial modes, producing the most even bass response possible without treatment. The 38% rule is a starting point, not a law — every room differs — but it is the first thing I try when setting up a system in a new room, and it improves bass evenness more than any cable swap or component change ever will.
The head position within the listening sweet spot matters at the inch level at high frequencies. At 10 kHz, the wavelength is 3.4 centimeters. Moving your head 3.4 centimeters to the left or right shifts the phase relationship between the left and right speakers by one full wavelength — the center image can shift, or the treble balance can tilt slightly. The practical takeaway is not that you need a head vise — it is that measurements taken with a microphone at a single point represent only that point, and the listening experience with two ears separated by roughly 17 centimeters averages two slightly different frequency responses. Binaural averaging smooths out the narrow peaks and dips that a single-point measurement shows, which is why a speaker that measures ±10 dB at one microphone position can still sound balanced to a human listener. Take measurements at multiple positions within a 30-centimeter radius of the listening position and average them. The averaged response represents what your ears actually hear better than any single-point measurement. Most modern room correction systems — Dirac Live, Audyssey, Anthem ARC — use multi-point averaging for exactly this reason.
The near-field vs mid-field distinction is not just about distance — it is about the ratio of direct to reflected sound. In a near-field setup with speakers 1.2 meters away in a room with a 300-millisecond modal decay, the direct sound arrives at a higher level relative to the reflected sound than in a mid-field setup with speakers 3 meters away in the same room. The near-field listener hears more of the speaker and less of the room. The mid-field listener hears more of the room’s contribution. Neither is wrong, but they demand different optimization strategies. Near-field benefits from precise speaker positioning and minimal treatment — you are already rejecting the room by sitting close. Mid-field demands more aggressive room treatment because the room’s contribution is proportionally larger. Understanding which regime you are in determines whether you should spend your next dollar on speaker positioning adjustments or acoustic panels. The near-field listening guide covers the small-room placement specifics in full detail.
Power Response and Directivity: Why the Same Speakers Sound Different in Every Room
A loudspeaker’s on-axis frequency response — the one published in the specification sheet — tells you what the speaker sounds like directly in front of it. The power response tells you the total acoustic energy the speaker radiates into the room in all directions, summed across all angles. The difference between the on-axis response and the power response is the directivity index. A speaker with smooth, consistent directivity — where the off-axis response is a gradually attenuated version of the on-axis response — sounds similar in different rooms because the reflected energy has the same spectral balance as the direct energy. A speaker with ragged directivity — where off-axis response has peaks and dips that do not match the on-axis response — sounds different in every room because the reflected energy has a different tonal balance than the direct energy, and the room’s reflectivity determines how much of that mismatched energy reaches your ears.
This is why a speaker that sounds bright in a bare room can sound balanced in a treated room. In the bare room, the ragged off-axis response produces strong high-frequency reflections that add to the direct sound. In the treated room, the absorbers at first-reflection points remove those off-axis contributions, and what remains is closer to the on-axis response — which may be more balanced. The speaker did not change. The room’s treatment of the off-axis energy changed what reached your ears. A speaker with well-controlled directivity — constant directivity horns, concentric drivers, or carefully designed waveguides — is more forgiving of room acoustics because the on-axis and off-axis responses are similar. A speaker with poor directivity control — many narrow-baffle designs with simple dome tweeters — demands more room treatment because the room’s contribution mismatches the direct sound. Understanding power response and directivity explains why some speakers are described as “room-friendly” and others as “picky about positioning.” The speaker placement guide covers positioning strategies that work with different directivity patterns.
The practical implication for choosing speakers is that you should audition them in a room similar to yours, or at least understand the directivity characteristics before buying. A speaker with a narrow, controlled dispersion pattern — like a horn-loaded design — will sound more consistent from room to room but will have a smaller sweet spot. A speaker with wide dispersion will fill the room more evenly but will interact more with the room’s reflective surfaces. Neither is better in absolute terms, but they suit different rooms and different listening priorities. In a small, untreated room like mine, I prefer speakers with moderate directivity — not so wide that every wall reflection colors the sound, not so narrow that I have to sit in a head vise to get a stereo image. The trade-off is real, and it is one of the few speaker characteristics that room treatment cannot fully compensate for.
Should I treat my room before upgrading speakers?
Yes. Room treatment at first-reflection points costs about $80 in materials and improves imaging and clarity more than any speaker upgrade at the same price. The same speakers in a treated room versus an untreated room sound like different systems — the room is the second speaker, and it is the one most listeners ignore.
What is the best speaker type for a small room?
Bookshelf speakers on stands with a subwoofer. Bookshelf speakers image more precisely than floor standers at the same price, and the subwoofer adds the bass extension the small cabinet cannot produce. This combination lets you position the subwoofer independently of the main speakers for optimal bass response.
How far should speakers be from the wall behind them?
At least 2 feet to reduce boundary bass reinforcement that makes the low end boomy. Closer placement adds up to 6 dB of bass boost but at the cost of clarity and evenness. If the speakers must be near the wall, use the supplied foam port plugs if available to reduce the boundary effect.
Do I need a subwoofer for music listening?
Not if your main speakers play flat to 30 Hz, which few do. Most bookshelf and moderate floor standing speakers roll off between 40 and 70 Hz. A subwoofer fills the bottom octave — 20 to 40 Hz — and relieves the main speakers of bass duty, which improves midrange clarity by reducing woofer excursion.
What is the equilateral triangle rule for speaker placement?
Position the speakers and the listening position so the distance between the two speakers equals the distance from each speaker to your ears — all three legs of the triangle are equal. This is the starting point for stereo imaging. Adjust the listening distance slightly longer for a wider soundstage or slightly shorter for tighter imaging.
Are electrostatic speakers better than box speakers?
Not universally. Electrostatics and planar magnetics produce a more dimensional, spacious soundstage than box speakers at the same price. But they need at least 3 feet of space behind them and careful side-wall distance to work correctly. In a small or compromised room, a good box speaker will outperform a constrained electrostatic.
What is the most common mistake in home audio setup?
Spending on speakers and electronics while ignoring the room. Untreated early reflections smear the stereo image, and untreated room modes create 10 to 15 dB bass peaks and nulls that no equalizer can fully correct. Fix the room first — it is the cheapest upgrade and the one with the highest return.