DIY Speaker Building: A Complete Guide for Real Results
Building your own speakers can match the sound of a commercial pair costing two to three times as much — but only if you respect the order of operations. A clean two-way DIY bookshelf can be built for roughly $150–$300 in parts and, measured in my listening space against a KEF LS50 Meta, holds its own on tonal balance while losing on cabinet polish and resale value. That trade is the whole story.
I run a small, lightly treated room in Sweden and I sweep everything that passes through it with a calibrated mic. So when I talk about DIY speakers I am not selling a romance about “hand-built warmth.” A speaker is a transducer with a measurable frequency response, a measurable impedance curve, and a crossover that either sums correctly at the listening axis or does not. This guide walks the whole build the way I actually approach it: drivers, enclosure, crossover, damping, finish, and — the step almost every beginner skips — measuring the finished result and trusting the curve.
Why Build Your Own Speakers (and When You Shouldn’t)
The honest answer up front: build your own when you want a specific result you can’t buy, when you enjoy the woodwork and electronics as much as the listening, or when you want to learn how a speaker actually works. The parts-to-performance ratio is genuinely good — you are not paying for a marketing budget, a dealer margin, or a retail showroom. A $250 driver-and-crossover bill can land you in the performance neighborhood of a $600–$800 finished speaker.
Where DIY stops making sense is equally important, and most build sites won’t say it. You will not beat a mass-produced cabinet’s fit and finish on your first attempt — injection-molded baffles and CNC-cut, veneered enclosures are hard to match in a home shop. DIY speakers have almost no resale value. And if your room is untreated, a perfectly built speaker will still sound mediocre, because the room is the component nobody sells you. Before you spend a weekend gluing MDF, read my room acoustics treatment guide — first reflections and bass modes decide more of what you hear than any driver swap.
If your goal is simply “good sound for the money” with zero fuss, a used pair of well-reviewed bookshelves is the rational choice; I compared a clean budget shortlist in best bookshelf speakers under $300. DIY is for when the journey is part of the point.
The Real Order of Operations
The single most common beginner mistake is buying drivers because they look impressive, then trying to design a box and crossover around them afterward. That is backwards. A speaker is a system, and the parts have to be chosen together. Here is the sequence I follow, and the order matters because each step constrains the next.
First, decide the design and the role. Near-field desktop monitor, stand-mounted bookshelf for a small room, or a bigger floorstander? A two-way is the right first project for almost everyone — one woofer, one tweeter, one crossover point. Three-ways add a second crossover region and a great deal of difficulty. Then pick proven drivers, model the enclosure, design the crossover to the measured driver response in the actual box, build and damp the cabinet, finish it, and finally verify the whole thing with a sweep. Skip the modeling and you are guessing; skip the final measurement and you never actually know what you built.
Two routes exist through this. You can follow a published, proven design (drivers, box dimensions, and a tested crossover all specified for you), or you can design from scratch. Beginners should start with a proven design or a kit — you get a known-good result and learn the assembly without the engineering. I break the shopping options down in best DIY speaker kits 2026, which is the lowest-risk on-ramp into the hobby.
Choosing Your Drivers
The drivers set the ceiling for everything else. A great crossover cannot rescue a ragged tweeter, and a stiff, well-behaved woofer makes the crossover designer’s life enormously easier. The two numbers that govern your whole build are the woofer’s Thiele–Small parameters — chiefly Fs (resonant frequency), Qts (total Q), and Vas (equivalent compliance volume) — because they determine what enclosure volume and alignment the woofer wants. A driver with a low Qts wants a ported box; a higher Qts often suits a sealed alignment.
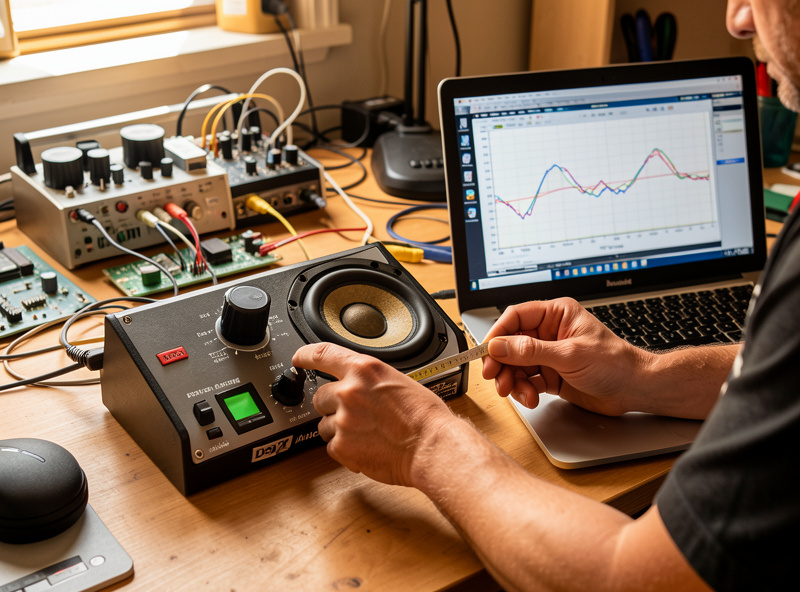
I measure T/S parameters myself with a Dayton Audio DATS-style impedance rig rather than trusting the spec sheet to the last decimal, because manufacturing tolerances are real — two woofers from the same batch can differ by a few percent on Fs. For matched stereo pairs, that matters more than the brand on the basket. When I’m choosing between candidates I look for a smooth on-axis response with no nasty breakup peak just above the intended crossover, a tweeter with a low enough Fs to cross safely (an Fs well below your crossover point, with margin), and sensitivities between the woofer and tweeter that are close enough to pad down without throwing away too much output.
Sensitivity and impedance also decide what amplifier you’ll need, which is why driver choice and amp choice are linked — an 84 dB sealed two-way is a very different load than a 90 dB ported design. I walk through that matching math in speaker sensitivity and amplifier matching. The full driver-selection process — reading T/S parameters, matching woofer to tweeter, and avoiding the common traps — gets its own deep dive in my speaker driver selection guide. If you want to shortcut the research, reputable houses sell driver sets curated to work together; a quick search for proven entry-level drivers will surface the usual suspects.
Designing the Cabinet and Enclosure Type
The enclosure is not just a box to hold the drivers — it is part of the acoustic system, and its internal volume and tuning shape the bass directly. Get the volume wrong and a woofer that should extend cleanly to 50 Hz will instead have a bloated hump or anemic, rolled-off bass. This is why you model the box before you cut a single panel, using free software like WinISD or VituixCAD, feeding in the measured T/S parameters and reading off the predicted low-frequency response for sealed and ported options.
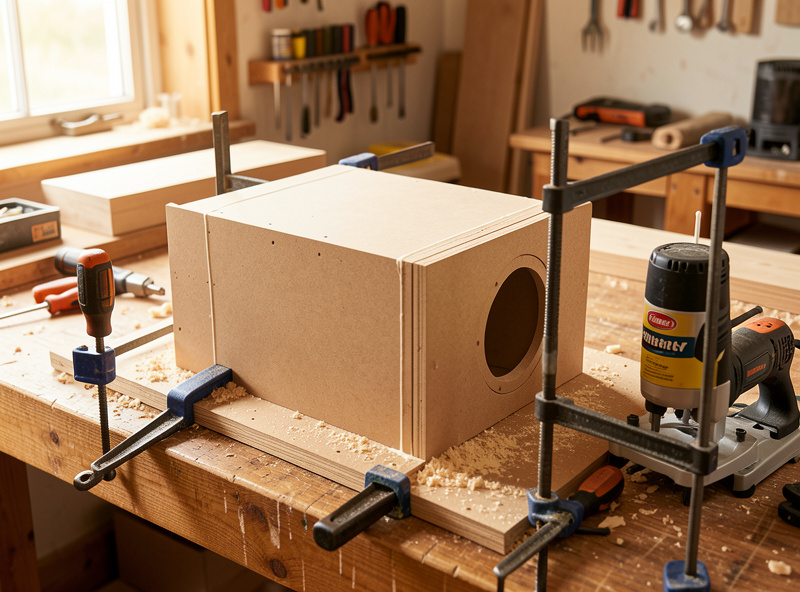
Material matters less than people think, as long as it’s dense and well-braced. Standard 18–19 mm MDF is the workshop default for good reason: it’s dimensionally stable, dense, machines cleanly, and is cheap. Baltic birch plywood is lighter and stronger but costs more and needs more careful edge work. What actually kills cabinet coloration is bracing and wall stiffness, not the exotic-ness of the material — an unbraced panel resonates and adds its own sound on top of the drivers. The construction details, joinery, bracing, and port fabrication all live in my speaker cabinet building guide.
Choosing the alignment is the first real design decision. Each has a measurable, predictable trade-off:
| Enclosure type | Bass character | Build difficulty | Best for |
|---|---|---|---|
| Sealed (acoustic suspension) | Tighter, gentler 12 dB/oct roll-off, less deep extension | Easiest — no port to tune | Small rooms, near-field, transient accuracy |
| Ported (bass reflex) | Deeper extension, more output near tuning, steeper 24 dB/oct roll-off below | Moderate — port must be tuned | Most general-purpose bookshelves and floorstanders |
| Transmission line | Deep, well-damped bass; large cabinet | Hard — complex internal geometry | Experienced builders chasing extension |
| Open baffle (dipole) | Open, room-interactive, limited deep bass | Moderate — no enclosure, but needs big baffle/EQ | Listeners who like the dipole presentation |
For a first build in a normal-sized room, a sealed two-way is the most forgiving and the easiest to get right — there’s no port to mistune, and the gentle roll-off integrates beautifully with a subwoofer later. If you want to understand the dipole option specifically, I compared the presentations in open baffle vs box speakers.
The Crossover: Where DIY Builds Live or Die
If there is one place where DIY speakers separate from kit-assembly, it is the crossover. The crossover splits the signal between woofer and tweeter, and a good one makes two drivers sound like one coherent source while a bad one smears the imaging, dips the response at the crossover point, or leaves a forward, fatiguing presence region. Textbook “Butterworth” or “Linkwitz–Riley” values calculated from nominal impedance almost never work as printed, because real drivers don’t present a flat resistive load — impedance rises with the woofer’s inductance and peaks at the tweeter’s resonance.
The right way is to measure each driver’s response in the actual cabinet, import those measurements into a crossover simulator like VituixCAD, and design the filter to produce a flat summed response on your design axis. That’s the workflow I use, and it’s the difference between a speaker that measures ±2 dB through the crossover region and one with an audible suck-out. Component quality matters less than topology done right — an air-core inductor and a decent film capacitor in the tweeter path are worth more than boutique parts thrown at a flawed design. The full process, from measurement to part values to assembly, is in my crossover design for DIY speakers guide.
This is also the strongest argument for starting with a kit or a published design: the crossover is already engineered and tested, so you assemble a known-good filter instead of debugging your own. There is no shame in that — learning to build the cabinet and solder a proven crossover cleanly is plenty for a first project.
Damping and Finishing
Two jobs remain once the box is built and the crossover works: controlling what happens inside the cabinet, and making the outside look like something you’d put in your living room. Internal damping — acoustic stuffing and panel-lining material — absorbs the back-wave energy from the woofer and tames internal standing waves and panel resonance. Too little and you get a hollow, boxy coloration; too much in a ported design and you over-damp the tuning and lose bass output. The amount and placement are design-specific, and I cover the measurable approach in my speaker cabinet damping guide.
Finishing is where patience pays. Veneer, paint, or oil all work; the secret is in the surface prep, the sealing of MDF’s thirsty edges, and the number of coats. A rushed finish is the single most obvious tell that a speaker was home-built. None of it changes the sound — finish is purely cosmetic — but it changes whether the speaker earns a place in the room or gets exiled to the garage.
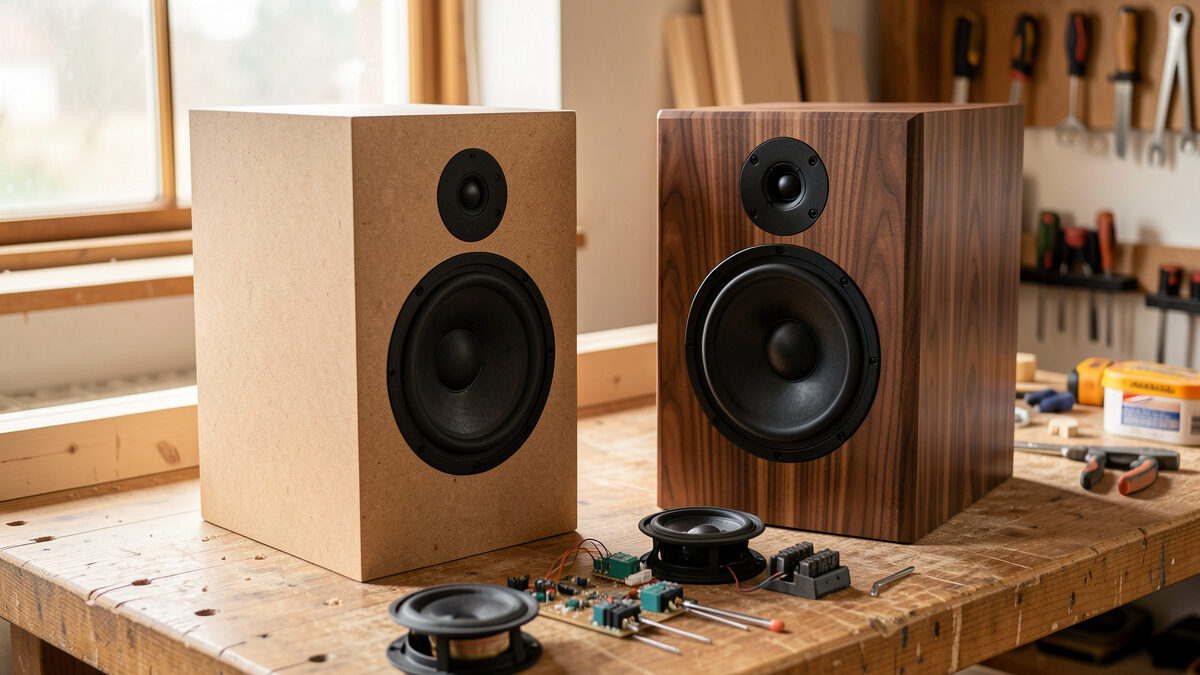
Building a Bookshelf as Your First Project
A stand-mounted two-way bookshelf is the right first build for almost everyone, and it’s the project I’d point any beginner toward. It’s small enough to be cheap and manageable, the single crossover point keeps the engineering tractable, and a good one genuinely competes with commercial speakers several times its parts cost. You’ll learn cabinet joinery, crossover assembly, damping, and measurement all in one weekend-and-a-bit project without the scale and complexity of a floorstander.
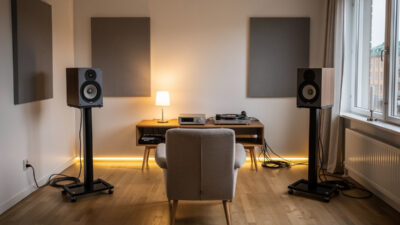
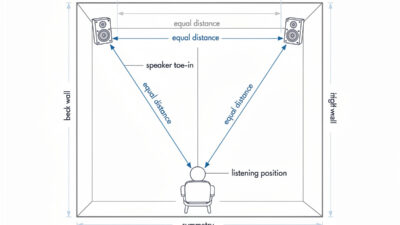
I walk a complete first build start to finish — cut list, assembly order, crossover wiring, damping, and the final measurement — in my DIY bookshelf speaker build guide. Pair the finished speakers with proper stands at the right height and a sensible near-field triangle (see near-field listening setup) and you’ll hear what they can actually do. If you later want more low-end weight, a small sealed two-way integrates with a sub beautifully — my notes on that are in subwoofer integration for music.
Measuring the Finished Build
This is the step that turns a craft project into an engineered speaker, and it’s the one almost everyone skips. A frequency sweep of the finished speaker tells you the truth: whether the crossover sums flat, whether the port is tuned where you intended, whether there’s a baffle-step deficiency or a presence-region peak. Without it you are listening with hope, not knowledge.
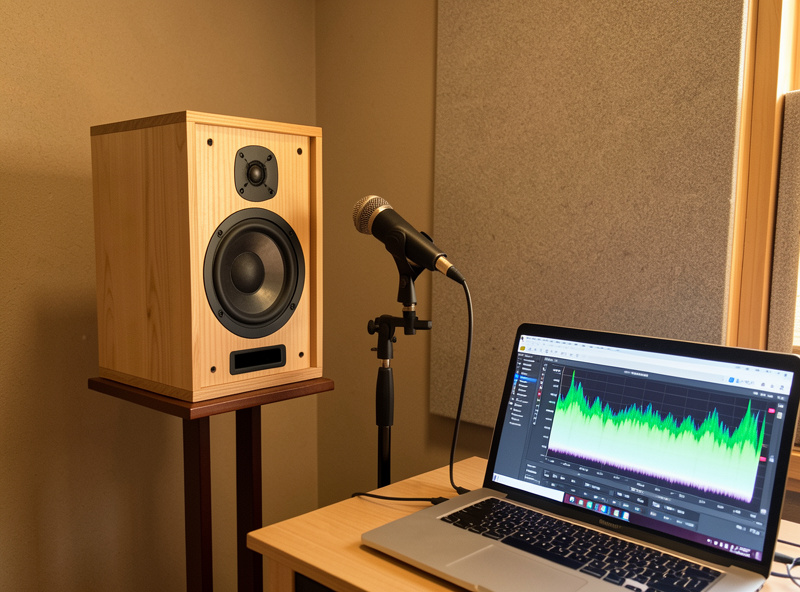
My rig is the one I use for everything in this room: a calibrated miniDSP UMIK-1 microphone and REW (Room EQ Wizard), which is free. I take a near-field measurement of the woofer and port to confirm the low-frequency alignment, a gated quasi-anechoic measurement at the listening axis to check the crossover summation away from room reflections, and then an in-room sweep at the seat. If you’re new to REW, my REW room measurement software guide covers the setup. The first time you see your own crossover region measure flat after you fixed it in simulation, the whole hobby clicks.
What you do not fix with measurement is the room itself, at least not by rebuilding the speaker. Below the Schroeder frequency the room dominates, and that’s a job for placement and DSP room correction — not for re-cutting the cabinet. I run that correction with a miniDSP unit and document the process in digital room correction explained. Build the speaker flat, then let the room and DSP handle the bottom octaves.
Tools and Budget
You don’t need a professional woodshop, but a few tools make the difference between clean panels and frustration: a circular saw or, better, access to a panel saw for square cuts; a router with a circle-cutting jig for the driver recesses; a good set of bar clamps; a soldering iron for the crossover; and wood glue. The measurement rig — a UMIK-1 and free REW — is the one purchase I’d insist on, because it’s what separates a guess from a build. A starter set of basic cabinet-building tools covers most first projects.
Budget-wise, a first two-way bookshelf typically breaks down as roughly $120–$220 for the driver pair, $40–$80 for crossover components, $30–$60 for MDF and hardware, and $20–$40 for damping and finish — call it $200–$400 all-in for a pair, before tools. A kit collapses most of that decision-making into one box. Either way, you’ll spend a fraction of what the equivalent commercial speaker costs, with the labor as your contribution. If you’re assembling the rest of the system around your build, my hi-fi systems beginner guide and best budget amplifiers under $500 cover the amp and source side.
As an Amazon Associate I earn from qualifying purchases.
Common First-Build Mistakes I See Constantly
Most failed DIY speakers fail for the same handful of reasons, and almost all of them are avoidable if you know them going in. The biggest is buying drivers first and designing the box around them afterward — a system has to be conceived together, not assembled from parts that caught your eye. The second is ignoring baffle step entirely. A speaker measured anechoically is flat, but mount it on a real cabinet in a real room and the lower frequencies that wrap around the box lose roughly 6 dB of relative level versus the highs. A crossover that doesn’t compensate produces a thin, bright, fatiguing speaker, and the builder blames the tweeter when the real culprit is unaddressed baffle-step loss.
Third is sloppy cabinet sealing on a sealed design or a poorly fabricated port on a reflex design — both leak and detune the alignment you carefully modeled. A sealed box has to actually be airtight; a gap around a driver gasket turns your modeled Q into something you didn’t design. Fourth is treating crossover component values as gospel from an online calculator that assumed a flat resistive load. Real drivers aren’t flat loads, which is exactly why measuring and simulating to the measured response is the whole game. And fifth, the one that quietly ruins otherwise good builds: never measuring the finished speaker, so you never learn that the crossover region has a 4 dB dip you’ve been listening through for months.
None of these are exotic. They’re the predictable consequences of skipping a step to save time. The discipline that prevents them is the same one I bring to every bench in the network — model it, build it carefully, measure it, and trust the curve over the marketing. The absorber at a first-reflection point and the stuffing inside a speaker cabinet are the same physics; absorbers don’t care what they’re absorbing. Get the process right and a home-built two-way will genuinely surprise people who paid three times as much for a badge.
Frequently Asked Questions
Is it cheaper to build your own speakers?
On parts cost, yes – a DIY two-way bookshelf runs about $200 to $400 per pair and can match a $600 to $800 commercial speaker on sound. But you supply the labor, and DIY speakers have almost no resale value, so the savings are real only if you value the build itself.
Are DIY speakers as good as commercial speakers?
On measured frequency response and tonal balance, a well-designed DIY speaker can equal commercial models costing two to three times the parts price. Where commercial speakers win is cabinet fit and finish, consistency, and resale value, which mass production does better than a home shop.
What is the easiest speaker to build for a beginner?
A sealed two-way stand-mounted bookshelf using a proven published design or a kit. One crossover point keeps the engineering simple, the sealed box has no port to mistune, and the small size keeps cost and woodwork manageable for a first project.
Do I need to measure my speakers, or can I just listen?
You should measure. A frequency sweep with a calibrated mic and free software like REW tells you whether the crossover sums flat and the port is tuned correctly – things your ears alone cannot reliably judge. Designing a crossover by ear almost always leaves an audible dip or peak at the crossover region.
What software do I use to design DIY speakers?
WinISD or VituixCAD for modeling the enclosure volume and port tuning from the driver’s Thiele-Small parameters, VituixCAD for designing the crossover to measured driver responses, and REW with a calibrated UMIK-1 microphone for measuring the finished build. All of these are free except the microphone.
Should I build from scratch or buy a kit?
Start with a kit or a proven published design. The drivers, box dimensions, and crossover are already engineered and tested, so you learn assembly and woodwork without the difficult engineering. Design fully from scratch only once you can measure your drivers and design a crossover to those measurements.